
Connecting a module to an existing table or a new table
Connect a target database to a module from a source database to sync exposed data
To connect a module – option to create new table
When you connect a module for the first time, all fields you map through the module interface are added to a new table by default. Choose Create new table if your existing tables don't contain any business logic yet, or if you want to rebuild some or all of your current business logic.
- From workspace home, click the card of the target database.
- Toggle on Edit mode.
- Click the Connect module card.
- Select a module in the Connect module dialog.
- Click the Next button.
- In the dialog, select a table or page from the menu, then select all fields you want to connect.
- Keep Create new table selected (this is the default when you connect a module for the first time).
- Click the Connect button.
- The dialog disappears and, if the connection is successful, the message Connected modules updated is briefly displayed in the upper right corner of your screen.
To connect a module – option to map to existing table
If you already have existing tables with working business logic—and you don't want to overwrite your current field names—choose Map to existing table.
For example, if you already have an Employees table and your workflows and formulas rely on the current field names, you probably don't want to create a new table and rebuild everything. In that case, mapping the module fields to your existing table lets you bring in the new data without disrupting what's already set up.
- In the dialog, select Map to existing table.
- In the upper-right corner, select the Data source (the source database that provides the module interface).
- Select the target table or page you want to map the module fields to.
- For each field on the left, use Map to field to select the corresponding field in your existing table on the right.
- Click the Connect button.
- The dialog disappears and, if the connection is successful, the message Connected modules updated is briefly displayed in the upper right corner of your screen.
Selecting and mapping fields
When connecting a module interface to a target database, you can decide how the exposed structure should be integrated into your local schema.
Instead of always creating a new local table, you can map the interface to a table that already exists in the target database. This allows interface data to be merged into existing workflows without duplicating structures unnecessarily.
During setup, Ninox displays the Select and map fields view. This is where you define how source fields and target fields correspond to each other.
Mapping fields correctly is an important step because it determines how data will be synchronized between the provider and the consumer.
Map to current table
Use Map to current table when the currently selected table in the target database should receive the interface data.
This option is useful when the selected table already represents the same entity as the interface, such as customers, employees, or orders.
Map to another table
Use Map to another table when you want to connect the interface to a different existing table in the target database.
This is useful when the target structure already exists but is not currently selected. It allows you to reuse your existing schema while still connecting it to the provider interface.
Why field mapping matters
Field mapping ensures that the provider and consumer understand which values belong together. Ninox proposes mappings automatically where possible, but these mappings should always be reviewed before confirming the connection.
Well-defined field mapping helps preserve type consistency, relationship integrity, and synchronization stability.

Select how the interface should be mapped into the target database and choose which side provides the initial data source.
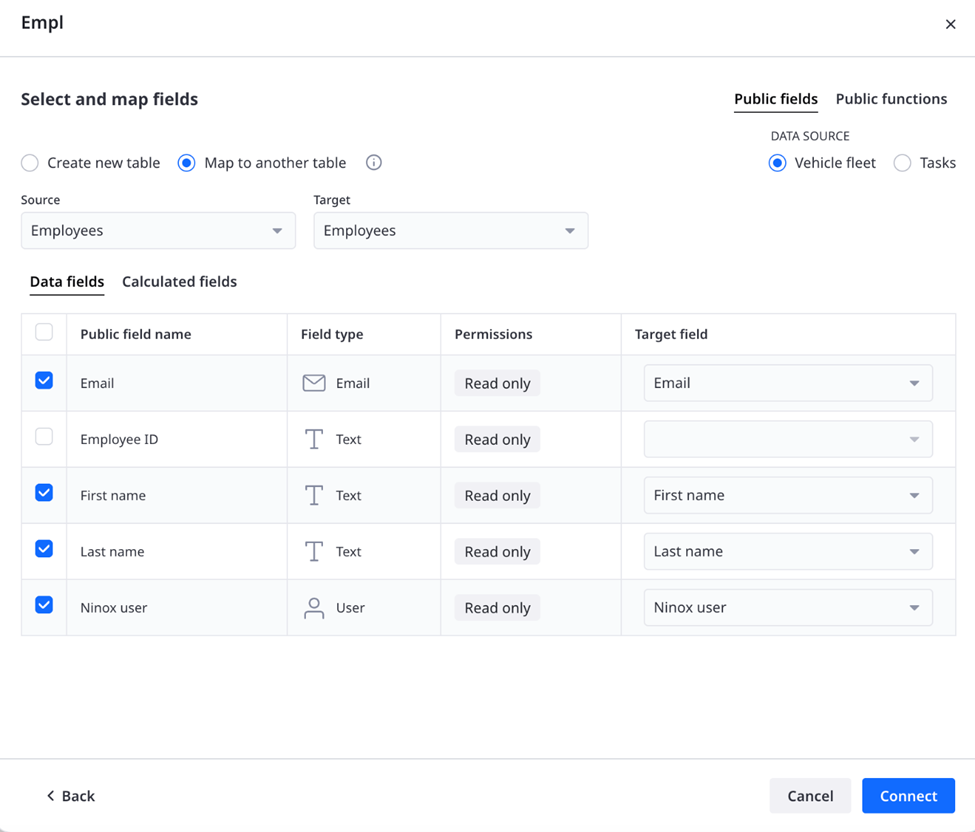
If the target database already contains a matching table, the interface can be mapped to that existing structure. During this step, you choose the source and target tables, define the data source, and map each public field to a target field.
Choosing the data source
When connecting an interface to an existing table, you must also decide which side should act as the data source.
In the mapping panel, Ninox lets you choose between Provider and Consumer.
This setting defines where the synchronized values originate during the initial connection and how ownership is established.
Provider as data source
When Provider is selected, the provider remains the source of truth.
The provider’s data is synchronized into the consumer database, and the consumer adopts the shared structure. This is the standard setup for most module connections and is usually the best choice when the provider already contains the authoritative data.
Consumer as data source
When Consumer is selected, the consumer’s existing data is used during the initial connection.
This is useful when the target database already contains relevant records and should bootstrap the shared structure. In this case, the data is first aligned with the provider, and the provider then continues as the owner of the synchronized structure.
This option supports migration scenarios where modularity is introduced into an already active system.
Why this choice matters
Choosing the correct data source is especially important when connecting a module to an existing table. It determines how the initial synchronization behaves and which records are used to establish the shared model.
Before confirming the connection, make sure it is clear which side contains the most reliable data.
Public functions
A module interface can expose not only public fields, but also public functions.
Public functions make reusable logic available to connected consumers. This allows a provider to share business rules, calculations, or utility logic through the interface, in the same way that it shares selected data structures.
Consumers can then use this logic without having to recreate it locally.
Why public functions matter
Without shared functions, logic often gets duplicated across databases. Over time, this makes maintenance harder and creates inconsistencies when business rules change.
Public functions solve this by making logic reusable and centrally maintained.
Typical examples include:
- pricing logic,
- validation rules,
- status transitions,
- helper functions for workflows.
By exposing only selected functions, the provider remains in control of what is shared.
Public fields and public functions
Public fields and public functions serve different purposes.
Public fields define which data structures are visible through the interface.
Public functions define which reusable logic can be called by consumers.
Together, they allow a module to share both information and behavior.

Select which fields to expose through the module interface, rename them if needed, and define whether each field is read-only or read and write.