Modularity FAQ and quick start
For users testing modularity v2 in Ninox 3.17 beta on Private Cloud
1. Introduction
Modularity lets you build a self-contained Ninox database (a module) that plugs into other databases through a module interface. The pay-off is isolation, reuse, and safe updates—bugs and schema tweaks stay inside their own module, and you can release new versions without affecting consumers.
This article is for partners who are testing modularity in its beta phase. We walk you from first contact through daily use and troubleshooting. If you need full definitions, keep the glossary open in a second tab.
ℹ️ Heads-up while you test the beta
- Some stages are under active development, so expect UI changes and occasional rough edges.
- Image fields aren't supported.
- Modules can't be shared across multiple workspaces.
- 3.17.9 and later: The HR module can be connected.
- For questions or issues while testing, please post in the closed beta forum.
- For documentation-specific questions, please comment directly under each support article, respectively.
ℹ️ For existing production databases you want to convert into modules
Existing links to connected databases and external API integrations should continue to work. The main caveat is exposing a field that originates from an inter-database connection created with modularity v1; that may not be supported. Please test this during the beta and share feedback if it doesn't work.
2. Key roles and terms
- Module provider: Builds the source database, exposes data (tables or pages, data and calculated fields, formulas), manages record and field permissions, and versions the interface
- Module consumer: Connects (to) the module by adding the target database to the same workspace.
- End user: Works in the finished solution, may be unaware that modules power it behind the scenes.
3. Understanding modules and interfaces
What is a module?
A module is a self-contained Ninox database that shares only the data and logic a module provider chooses. You can reuse it in any database of the same workspace and update it safely without exposing your internal setup.
What is an interface?
An interface is the public contract between a source database and any target databases that connect to it. The interface defines all exposed data as well as record and field permissions. To expose data, public names are required:
- interface (the public name is an ID that's also an API-level identifier)
- tables
- pages
- fields
- formulas
Module architecture
A module exposes selected parts of a source database through an interface, allowing other databases to sync data via field mapping.
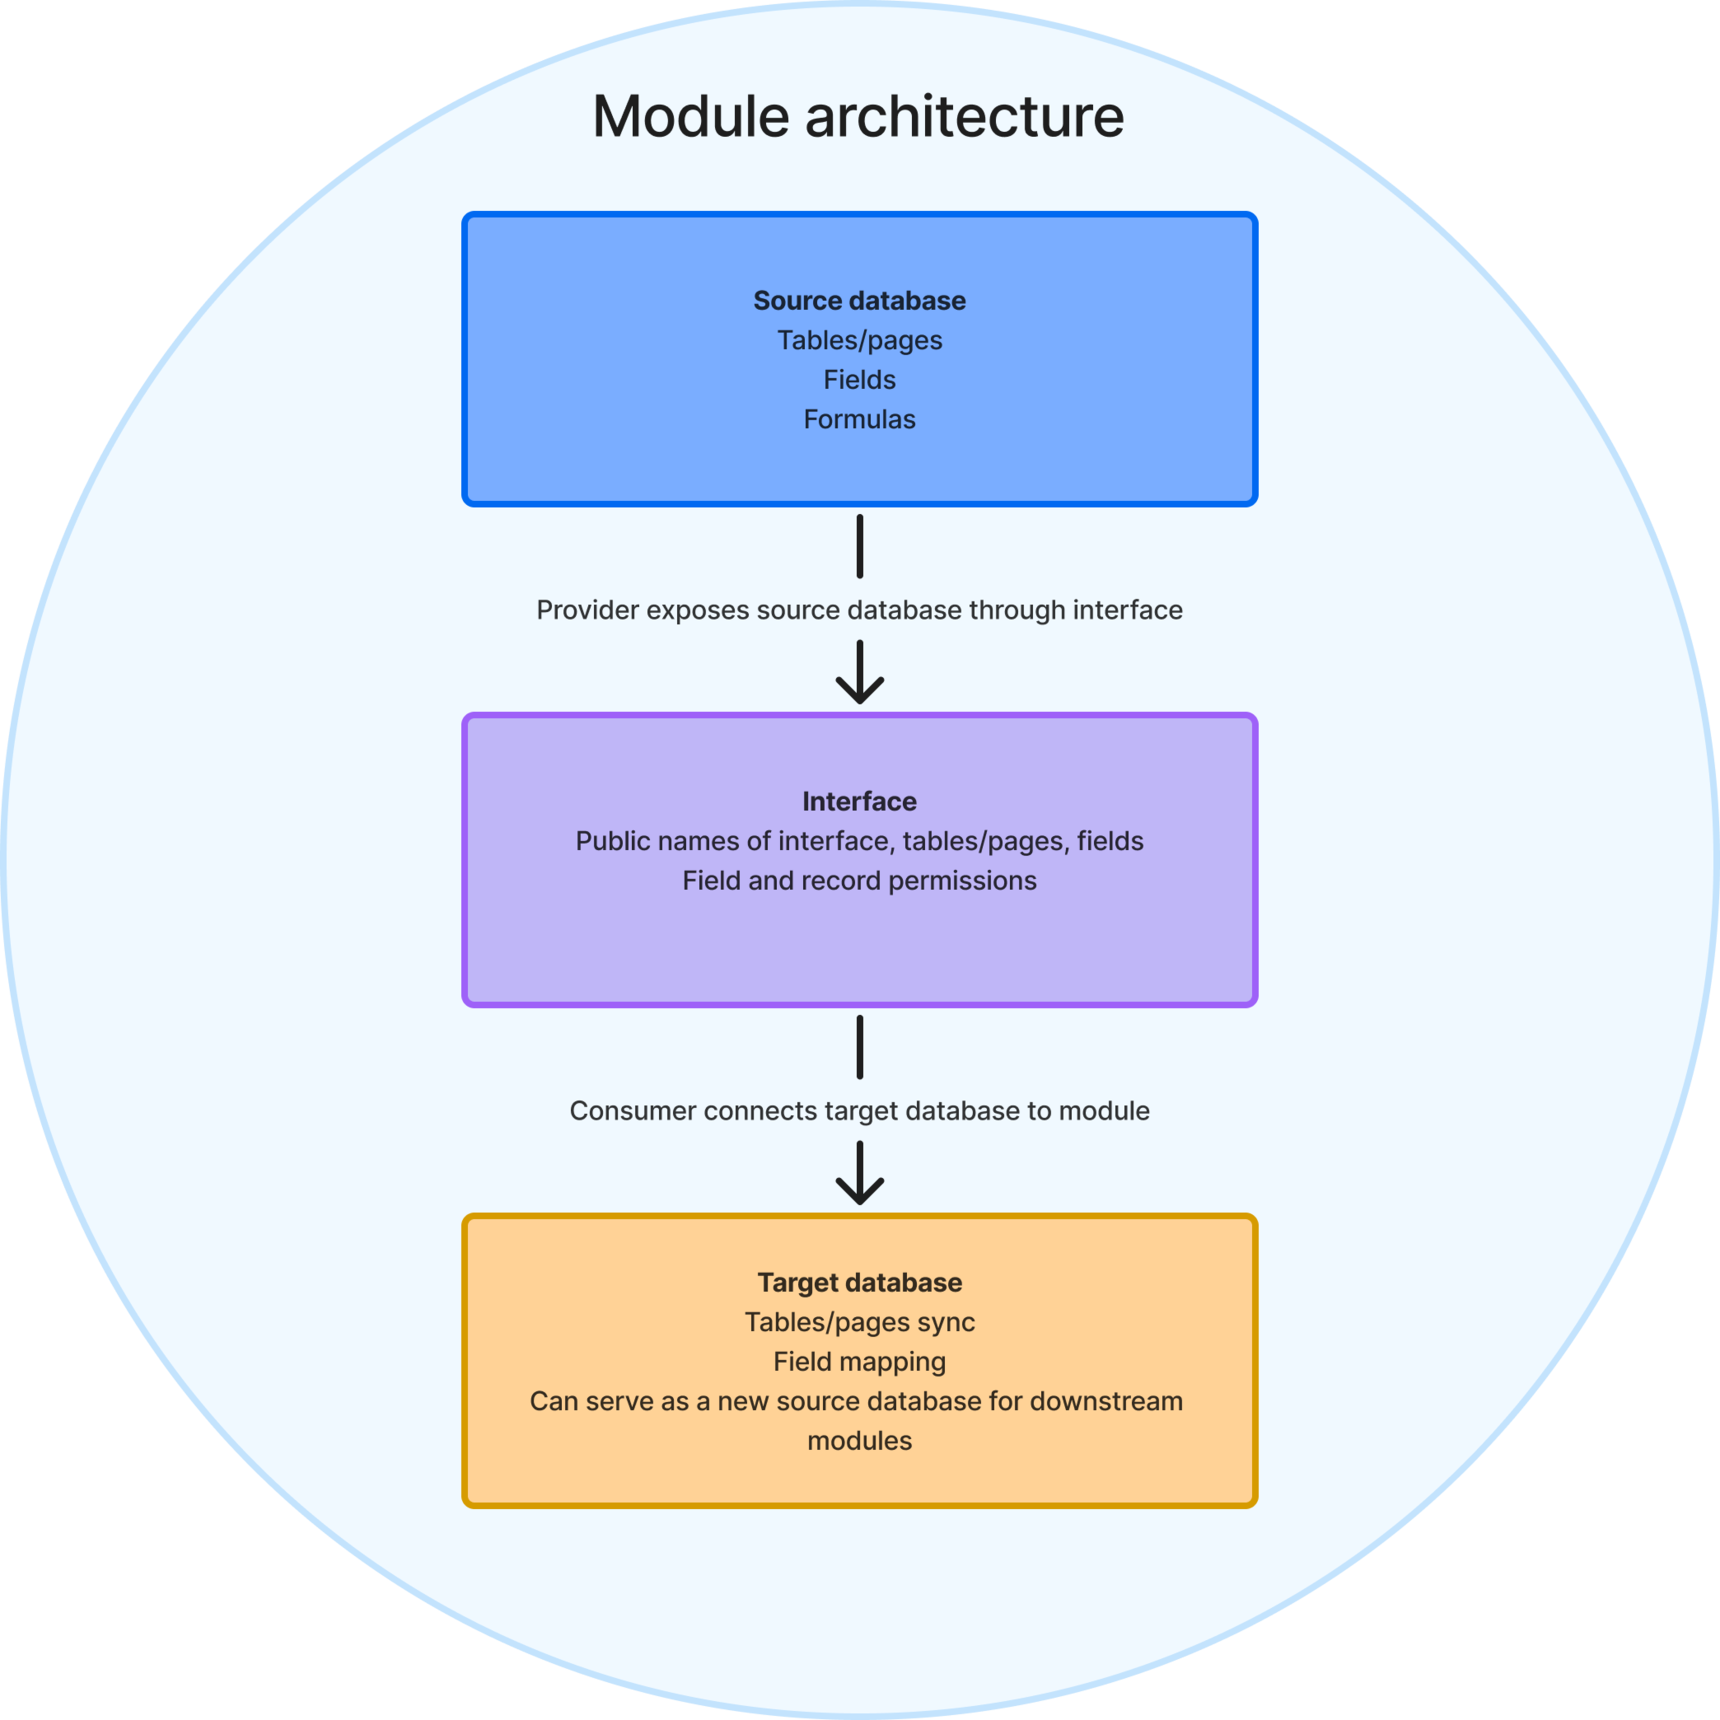
- Source database: Where all tables/pages, fields, and formulas live. Anything the provider exposes here goes out through the interface. The provider always retains write access.
- Interface: The schema-based contract between a source and a target database that defines how data and logic flow between modules. It includes all internal names (only visible to providers) and public names (visible in target databases), as well as record and field permissions.
- Target database: What end-users install. Ninox creates external tables here that mirror the exposed data, apply field mapping, and stay in sync while connected. Providers decide whether end-users can write back to those tables, and a target database can also serve as a new source database for downstream modules.
4. Module lifecycle
Design module interface
Build your schema, scripts, and business logic in a regular Ninox database. Treat this as the blueprint for your module.
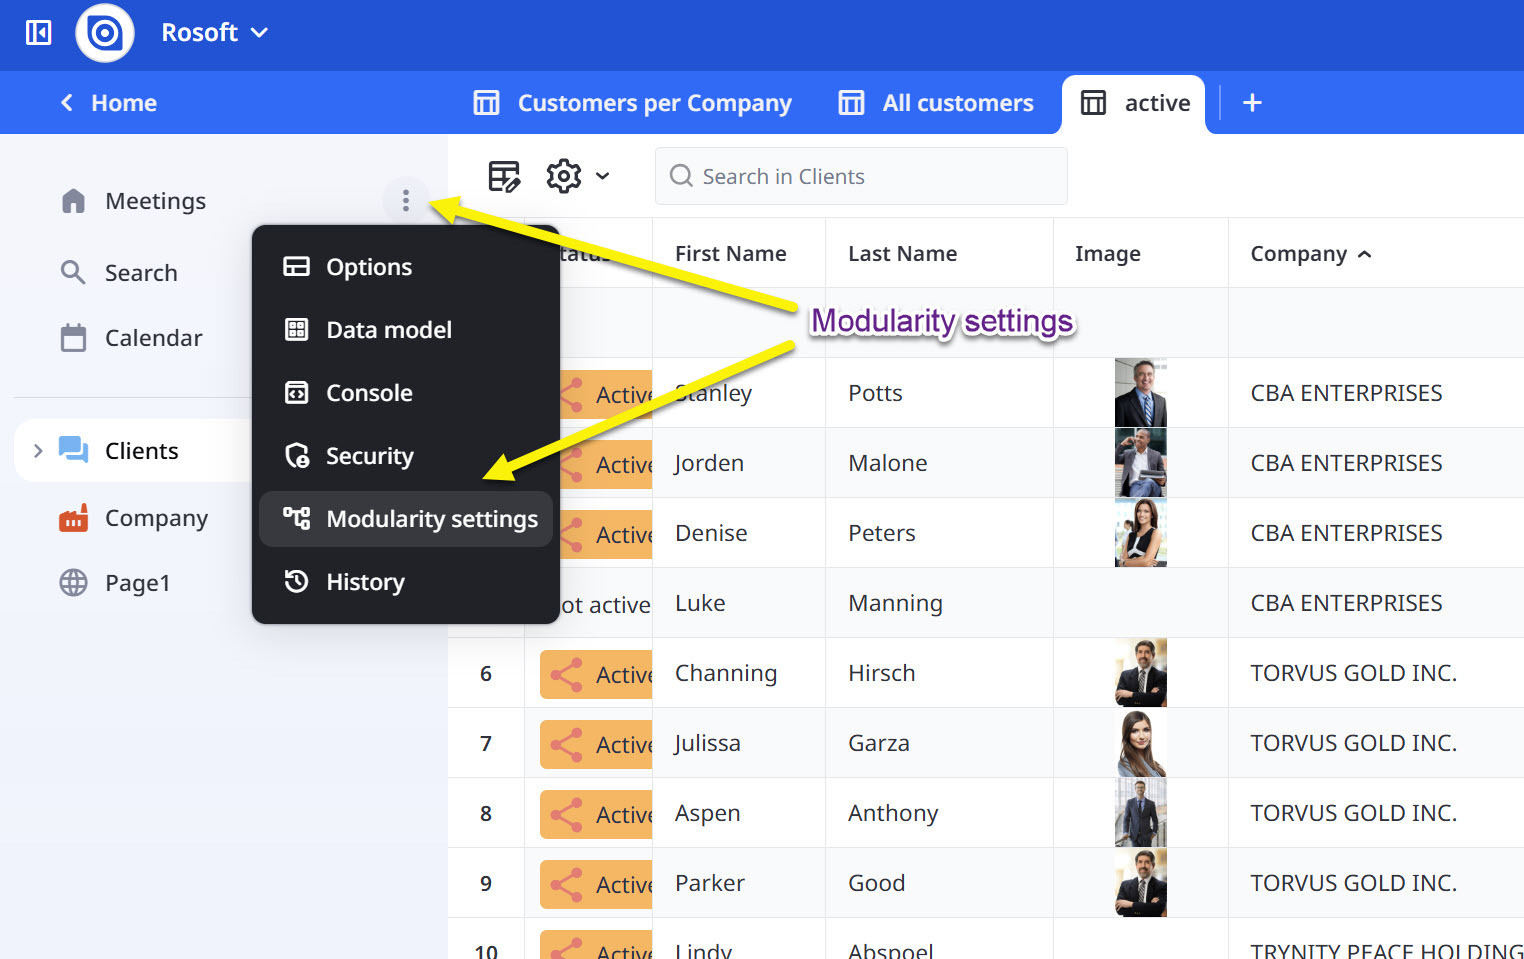
Expose (with limits) module interface
In Module settings, click Configure public fields to choose which tables, pages, and fields are available to others. You can expose data fields, and calculated fields. Image fields and global functions can't be exposed at the moment.
Connect and use module
When someone connects your module to a workspace, Ninox creates external tables that stay in sync with the source (based on the exposed interface). If permitted, the source can also accept writes through that interface.
Change the interface (provider) and apply updates (target)
When the module provider changes the exposed interface (for example: adding/removing fields, changing access, moving or deleting exposed elements), a new interface version becomes available.
Module consumers can choose when to apply an available update. Until they apply it, they can continue working with the last synced state of the data in their workspace. While an update is pending, syncing is paused. Once the module consumer applies the update, sync resumes.
Disconnect module
Disconnecting stops the sync and removes the active connection. Existing data in the target workspace remains available. Reconnecting later restores the connection and sync. All fields will be remapped automatically. If the source database changes in the meantime, the source data will overwrite the target data.
Delete connection
Deleting removes the module connection from the target workspace and stops sync permanently for that connection. The tables that were created by the module remain in the workspace as normal tables, including their data.
After deletion, the previous connection can't be restored. If module consumers want the module again, they must create a new connection from scratch, which requires remapping all fields and will create a new set of connected tables.
If the provider deletes the source database
If the source database is deleted, existing connections can no longer sync. What happens to existing target data depends on whether the module consumer disconnects or deletes the connection.
5. Names and IDs—what you can rename
⚠️ Interface ID: A unique, human-readable identifier for the interface (API). Renaming it creates a new interface. Existing consumer connections in the target databases remain tied to the old interface ID and won't automatically switch—sync stops, and consumers must reconnect (and remap, if required) to the renamed interface ID to resume syncing data from the module.
✅ Table, page, and field names: Only visible to providers, safe to rename any time.
✅ Public names of tables, pages, and fields: Consumer-facing names associated with a hidden system ID. Safe to rename because the hidden ID never changes.
6. Data sharing and synchronization
✅ Supported today
- Data fields: text, number, date + time, yes / no, choice, multiple choice, relationship
- Calculated fields: dynamic choice, dynamic multiple choice, formula
🟡 Coming soon
- Global functions (we're already working on support for this)
❌ Not supported
- Image fields (these will not be supported)
👉 For testing purposes
Import your data using only the supported field types listed above (data fields, calculated fields, and—once available—global functions).
7. Where to go next
- For a deeper, more abstract understanding of Ninox modularity, visit the modularity concepts.
- For precise definitions of roles, fields, names, and permissions, refer to the glossary.
15 replies
-
Love it. Very exciting times for us end users.
-
Hey, can we try out the beta version of modularity in the public cloud?
I'm having trouble finding "Module settings > Configure public fields."
-
Hi,
love the ideas behind ninox Modularity 2, unfortunatelly I missed the beta webinar and only watched the recording later.
2 ideas:
I thinks that the interface name should be called interface identifier or interface label, to stress that has to be unique and not changed, unlike names of fields and tables in ninox.
It would be cool to have multliple interfaces on a provider DB. Example use case of your HR module: consumer DB A for benefits and reimbursements needs name, employment date, department and birthday. consumer DB B for warehouse stocks only needs name and deparment or job position. consumer DB C for project management needs write permissions to time tracking and vaccation days.
Probably the biggest worry about modularity (from a dev/user side) is the double memory consumption. Maybe in the future you can improve this by "mirror while connected" and "duplicate on edit interface or move/delete provider"
-
The functionality looks promising!
We can already link databases, but I hope this mechanism will:
(a) make it a little simpler to reconnect databases when databases are restored from backup, but mostly
(b) will speed up calculations that use data from external databases, because the data will be synced locally.