
Private Cloud SSO setup guide – Microsoft Entra (SAML)
This guide explains how to set up single sign-on (SSO) with SAML on a Ninox Private Cloud using Microsoft Entra
Before you begin
Make sure you have the following before you start:
- Access to a Ninox Private Cloud Enterprise subscription with single sign-on (SSO) enabled.
- Owner or Admin rights for the Ninox Private Cloud you will configure.
- Cloud Application Administrator (or higher) rights in Microsoft Entra ID.
- Your Private Cloud domain, for example acme.ninoxdb.de or acme.ninoxdb.com.
Configure in Microsoft Entra
1. Create the enterprise application
- Follow Microsoft's Quickstart: Add an enterprise application guide to create an enterprise application.
- When instructed to name the application (step 5 in the guide), choose a name like Ninox SAML.

2. Assign a user account
⚠️ Warning: Test SSO only with a Ninox user whose email is already active. If the email isn't in Ninox—or later gets deactivated—SAML sign-in will fail.
- Follow Microsoft's Quickstart: Create and assign a user account guide to assign a user.
- When instructed to choose an enterprise application (step 2 in the guide), select Ninox SAML (the one you just created).


3. Enable SAML single sign-on
Enter Ninox values in SAML configuration
- In the left pane of the Ninox SAML app, select Single sign-on > SAML.
- Under Basic SAML Configuration, click Edit.
- Enter the Ninox values:
Microsoft field |
Required |
Value |
Identifier (Entity ID) |
Yes |
http://adapplicationregistry.onmicrosoft.com/custom-name/primary
|
Reply URL (ACS) |
Yes |
https://my-private-cloud.ninoxdb.de/ums/saml/consume
|
Sign-on URL |
Yes |
https://my-private-cloud.ninoxdb.de/ums/saml/login
|
Relay State |
Yes |
WEB |

- Click Save.
Add 2 new claims
- Under Attributes & Claims, click Edit.

- On the Manage claim page, add a new claim:
- For Name, enter firstName.
- For Source attribute, enter select user.givenname from the dropdown


- Click Save.
- Add another claim:
- For Name, enter lastName.
- For Source attribute, select user.surname from the dropdown.
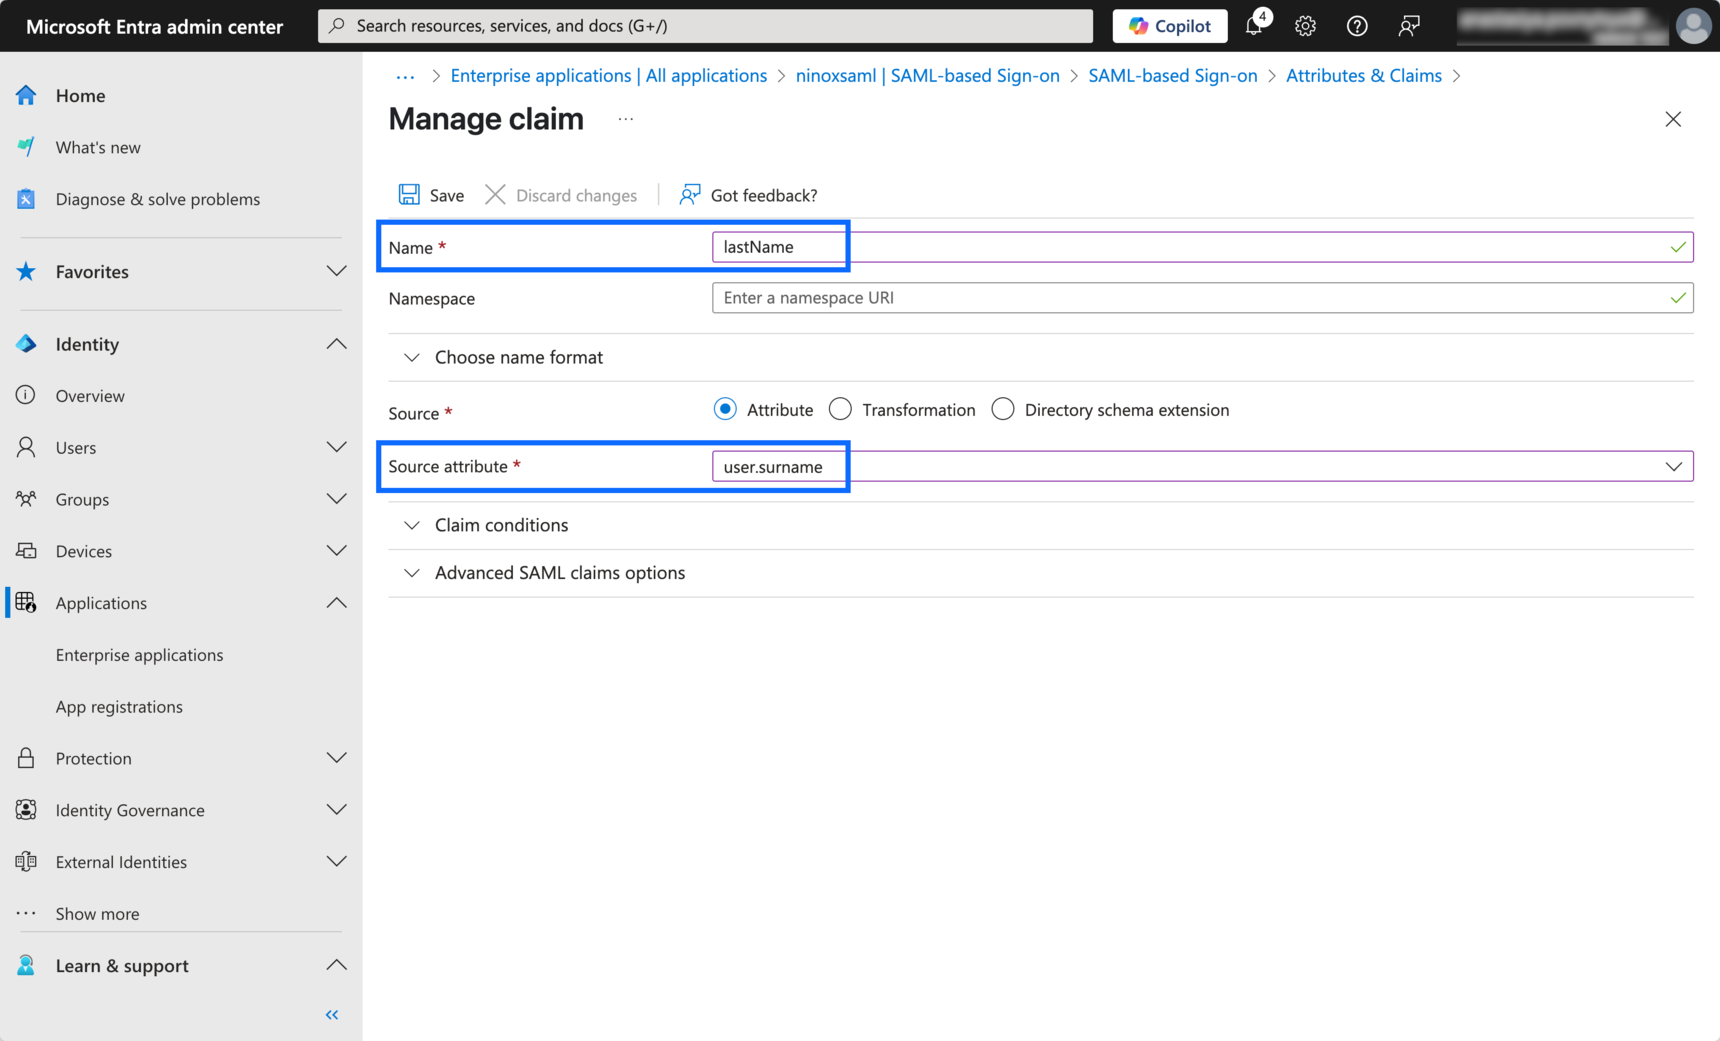
- Click Save.
Add a group claim
- Still on the Manage claim page, add a group claim:
- For Which groups associated with the user should be returned in the claim?, select Groups assigned to application
- For Source attribute, ensure Group ID is selected (this is the default).

- Click Save.
Enter the App Federation Metadata Url
- Under SAML Certificates, past into the App Federation Metadata Url field the Ninox single sign-on URL you'll will find it in the Enter Microsoft values. In the screenshot below, you'll see an example value.
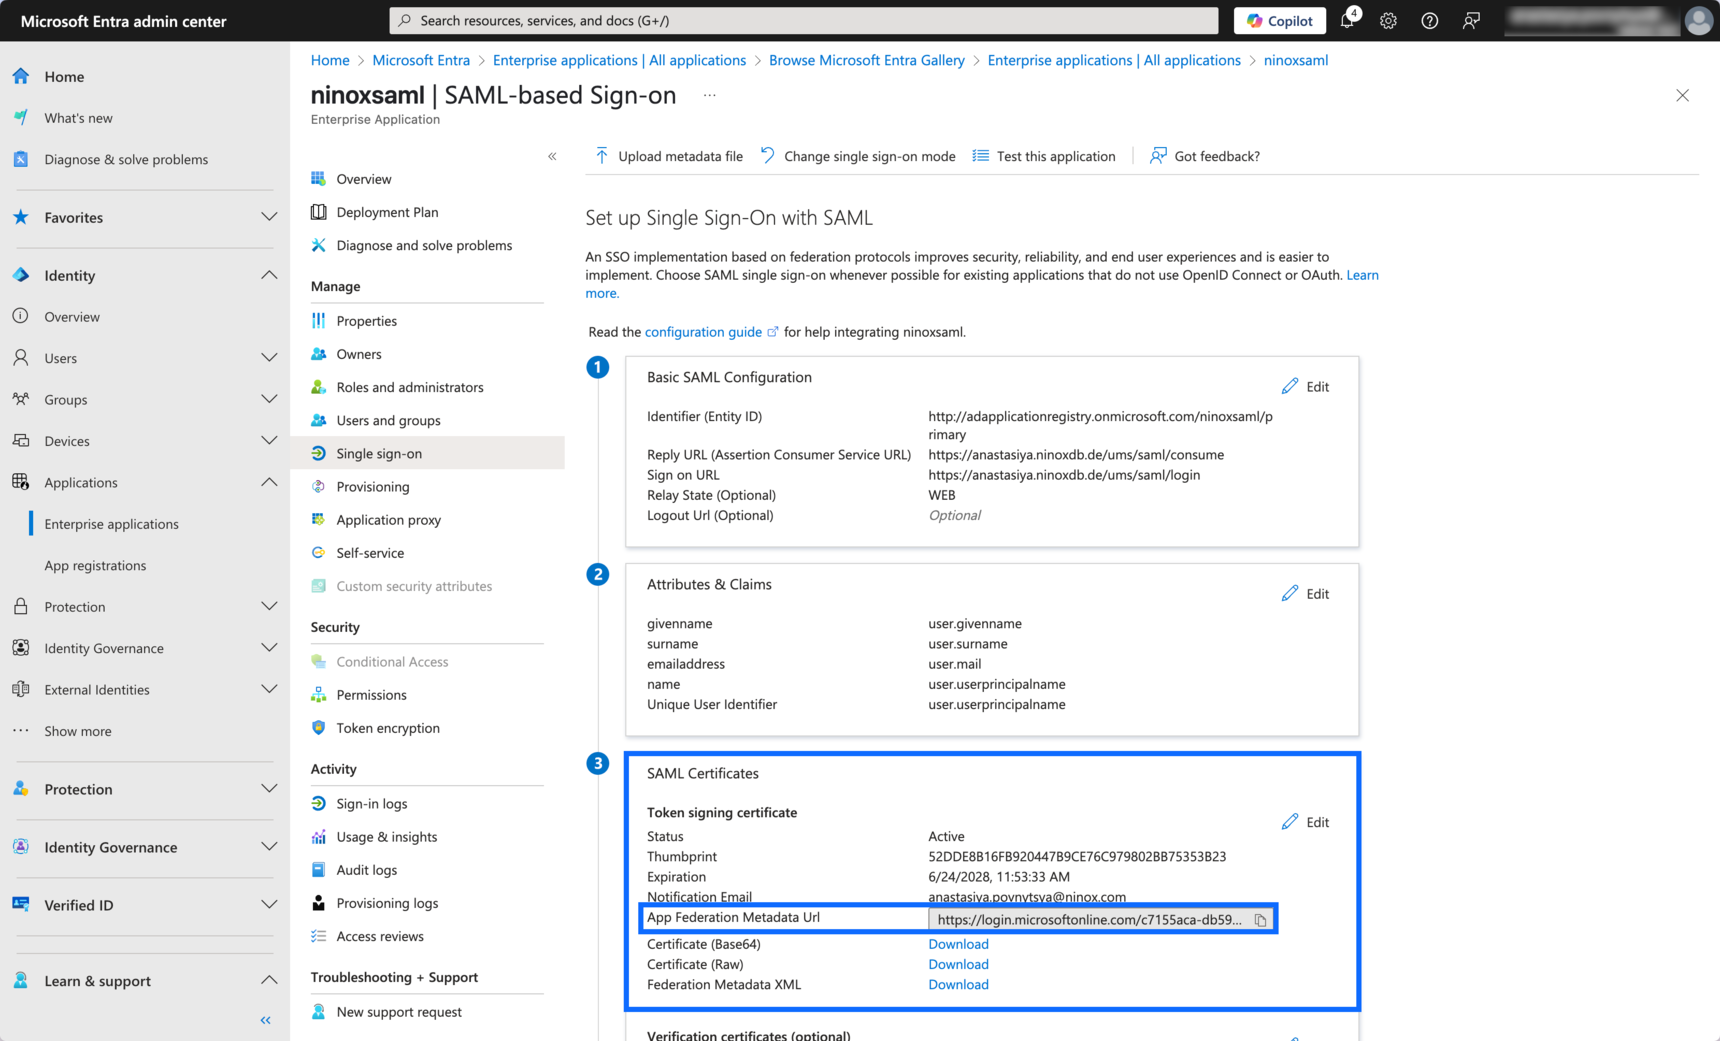
Download certificate
- Under SAML Certificates, click Download beside Certificate (Base64).

Configure in Ninox Private Cloud
Enter Microsoft values
- In Ninox, open Ninox settings > Configuration, switch to the Authentication tab, and select Security Assertion Markup Language (SAML).
- Enter the Microsoft values:
Ninox field |
Required |
Value |
Single sign-on URL |
Yes |
https://login.microsoftonline.com/c7155aca-db59-4686-9cc7-40b6f1c15c95/saml2 Enter the single sign-on URL created in Microsoft Entra (Single sign-on SAML > SAML Certificates > App Federation Metadata Url.
|
Identity provider issuer |
Yes |
http://adapplicationregistry.onmicrosoft.com/custom-name/primary Enter the Identifier (Entity ID) created in Microsoft Entra (Single sign-on > SAML > Basic SAML Configuration > Edit).
|
Upload IDP certificate |
Yes |
Upload the Certificate (Base64) you downloaded from Microsoft Entra (Single sign-on > SAML > Basic SAML Configuration). |
Audience |
Yes |
http://adapplicationregistry.onmicrosoft.com/custom-name/primary (same as Identity provider issuer). |
Property name of group attributes in SAML assertion |
Yes |
http://schemas.microsoft.com/ws/2008/06/identity/claims/groups (default) Enter the Claim name from the Groups claim you created in Microsoft Entra (Attributes & Claims › Groups assigned to application).
|
Session expiration limit (days) |
No |
Any positive number, e.g., 7. |
Auto-assign to workspace |
No |
Enter a workspace ID if you want every new user added to that workspace automatically.
|
Auto-assign role |
No |
Comma-separate any roles (e.g. user,editor,admin) you want to assign to a user. Setting a default role prevents the user from logging in without permissions. |
Exclude roles for mapping (comma-separated) |
No |
Comma-separate any SAML roles (e.g., admin,user,guest) you don't want mapped—Ninox ignores them during role mapping even when other SAML roles are kept or merged. |
Role mapping |
Yes |
Keep roles from Ninox to keep the roles you already have in the workspace and ignore roles coming from SAML (default). Keep roles from SAML assertion to remove any roles you previously had and keep only the roles coming from SAML groups. Merge roles from Ninox and SAML assertion to merge roles from SAML groups with any roles you already have. |
Auto-provision collaborators |
No |
Toggle ON if you want users created automatically on first login. |

- Click Save and restart.
Test single sign-on in Microsoft Entra
The steps below mirror Microsoft's Quickstart: Add an enterprise application guide.
- In the Set up single sign-on pane of your Ninox SAML application, locate the Test single sign-on with Ninox SAML section.
- Click Test.
- When the Microsoft Entra sign-in window opens, sign in with the user account you assigned to the application.
- After successful authentication, you're redirected to your Private Cloud:
- If the user is auto-assigned to a workspace, they land on its home screen and see its databases.
- If the user isn't assigned to a workspace, the home screen will appear empty until an owner or admin assigns them to one.
ℹ️ Note: If the SSO setup was done incorrectly and the test sign-in fails, your cloud's SSO configuration will need to be reset before you can try again.
Troubleshooting
- Loop or 401 error: confirm every value in Ninox matches the values in Microsoft Entra exactly.
- Error AADSTS50105: ensure you assigned the correct user to your enterprise application in Microsoft Entra.

- Invalid certificate: if you edited any field in Basic SAML Configuration after downloading the certificate, download a new Certificate (Base64) and upload it to Ninox.
- Missing NameID: ensure the default emailaddress claim is present.
- Need deeper diagnostics: Microsoft's Troubleshoot SAML-based single sign-on guide walks through common errors step by step.
✅ Tip: If Microsoft's interface changes, refer to their latest Enable SAML single sign-on for an enterprise application guide. The Ninox-specific values remain the same and should be entered as shown.
Additional help
Quickstart: Add an enterprise application
Quickstart: Create and assign a user account
Enable SAML single sign-on for an enterprise application